Neutralizing Kernel DMA Protection
This post is about pre-boot DMA attacks against modern windows targets during physical pentest scenarios using the PCILeech firmware and a suitable FPGA board. You can find the DMAReaper.py tool described in this post here.
During a physical pentest against a simulated stolen laptop, one of the main objectives is finding a way to modify UEFI configuration such that we can enable a Direct Memory Access (DMA) attack. In modern times, attackers will commonly face hardened laptops which have a multitude of firmware countermeasures enabled by default. Additionally, most modern laptops implement hardware encryption in the form of BitLocker, and use a TPM to track changes to the pre-boot configuration. This makes modification of certain UEFI settings without triggering BitLocker recovery a non-trivial challenge. There are some existing solutions to these issues.
My FirstStrike approach is to leave “DMA Protection” and “Intel VT-d” features enabled in BIOS, opting only to disable “Intel VT-x” or “Virtualization Technology” when this settings can be controlled without triggering BitLocker Recovery.
The attack then injects a modified PCILeech kernel module during pre-boot which detonates automatically from within ntoskrnl.exe once the OS is loaded. This technique works despite OS level Kernel DMA protection being enabled, but there are several limitations.
Caveats
In some recent UEFI implementation, Intel VT-x cannot be disabled while VT-d is enabled (the option is greyed out). Additionally, sometimes VT-x cannot be disabled without turning off Virtualization based BIOS Security, which itself can trigger BitLocker recovery. Finally, during a real physical pentest, you may encounter a target protected by a BIOS password on hardware for which no known BIOS password bypass technique exists.
Furthermore, the FirstStrike shellcode only works against targets running windows 10. There is no public solution against Windows 11, and windows 10 is soon to be retired.
We need an alternative method to disable Kernel DMA protection for these circumstances!
Initial Setup
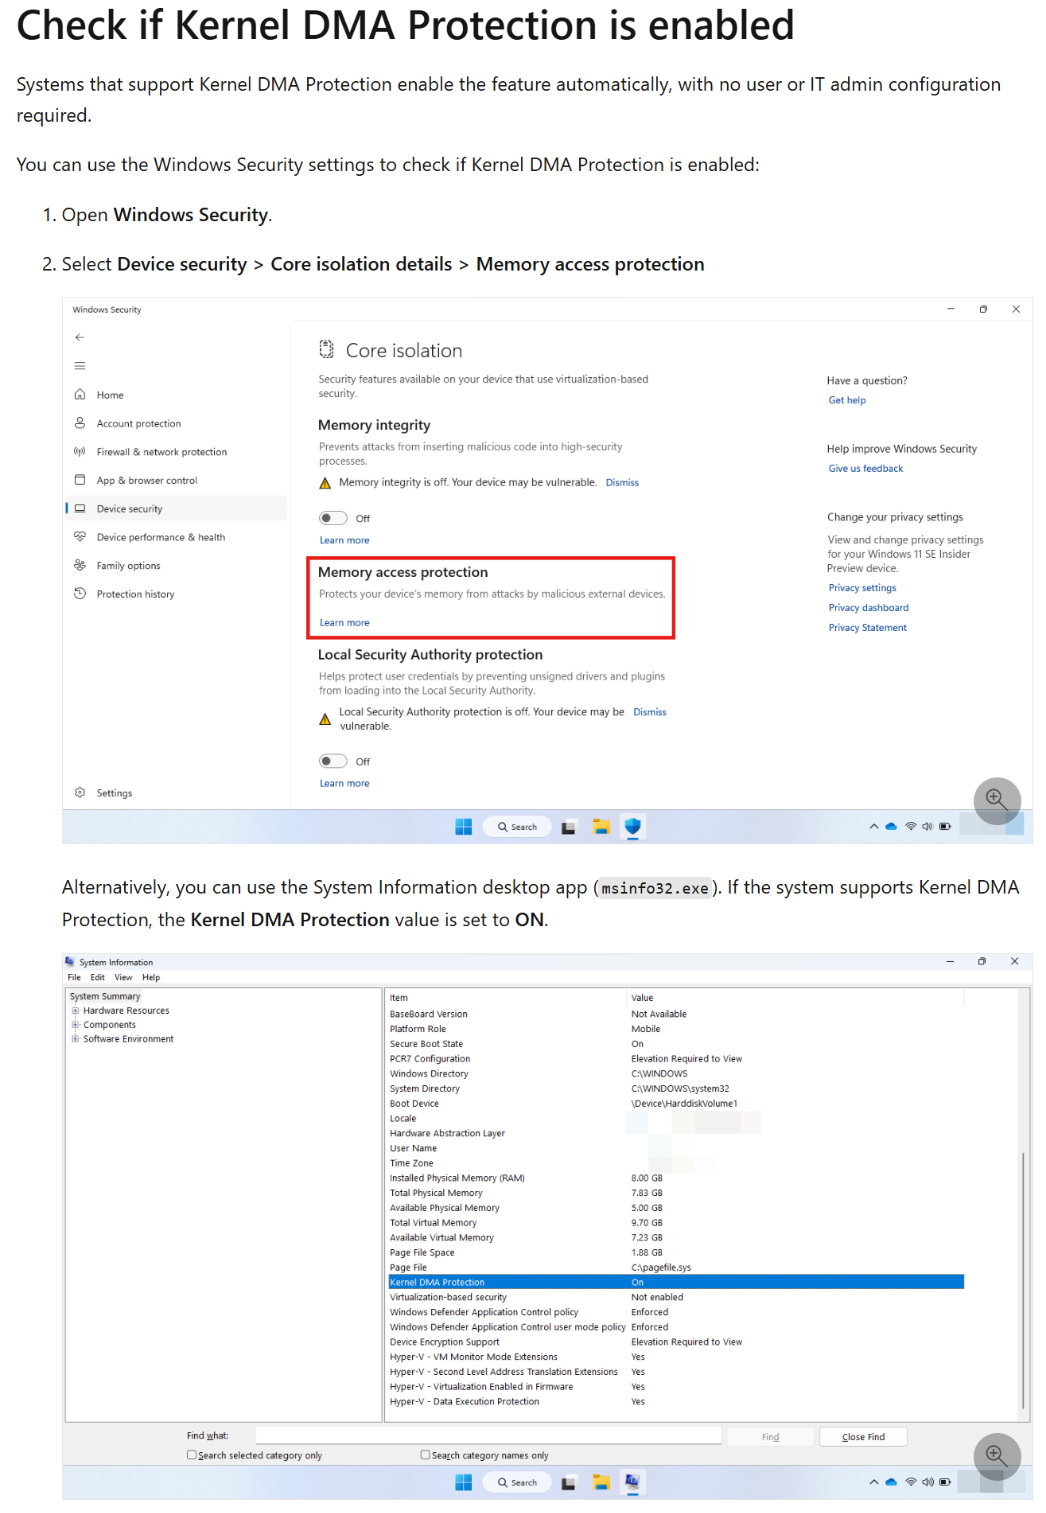
Before we continue, let’s check our windows target and make sure that Kernel DMA Protection is indeed enabled.
The documentation from microsoft states that we can check this in two places , MSINFO and “Device Security”.
Ok, let’s confirm those elements on our target laptop. Note we use Windows 10 here for convenience but everything is replicated on windows 11 later in the post :
Device Security
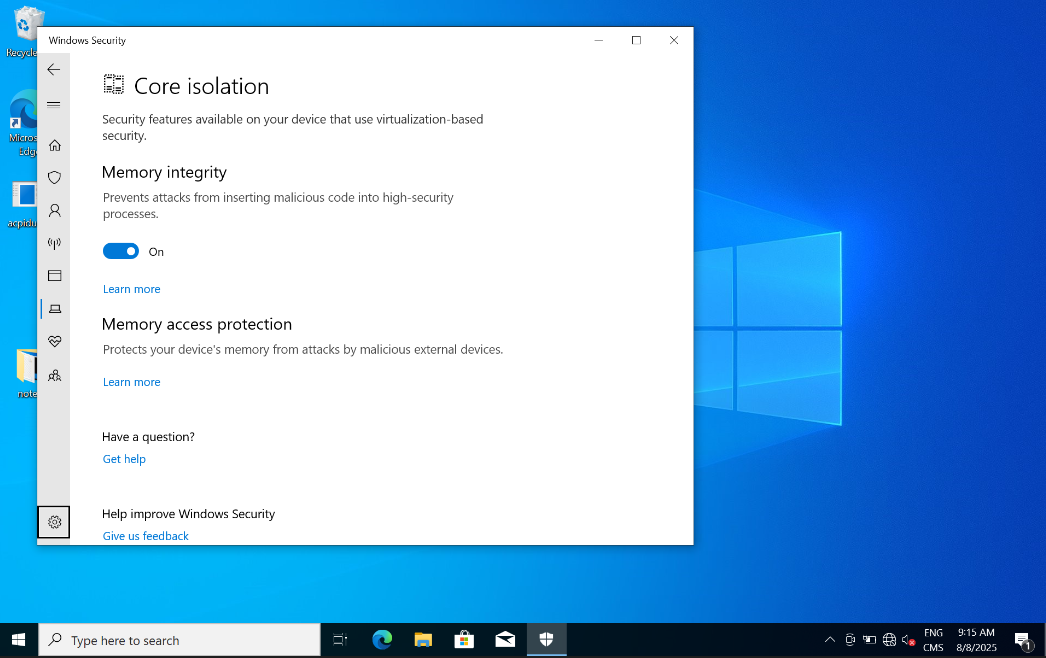
Looks good. Memory Access Protection is on.
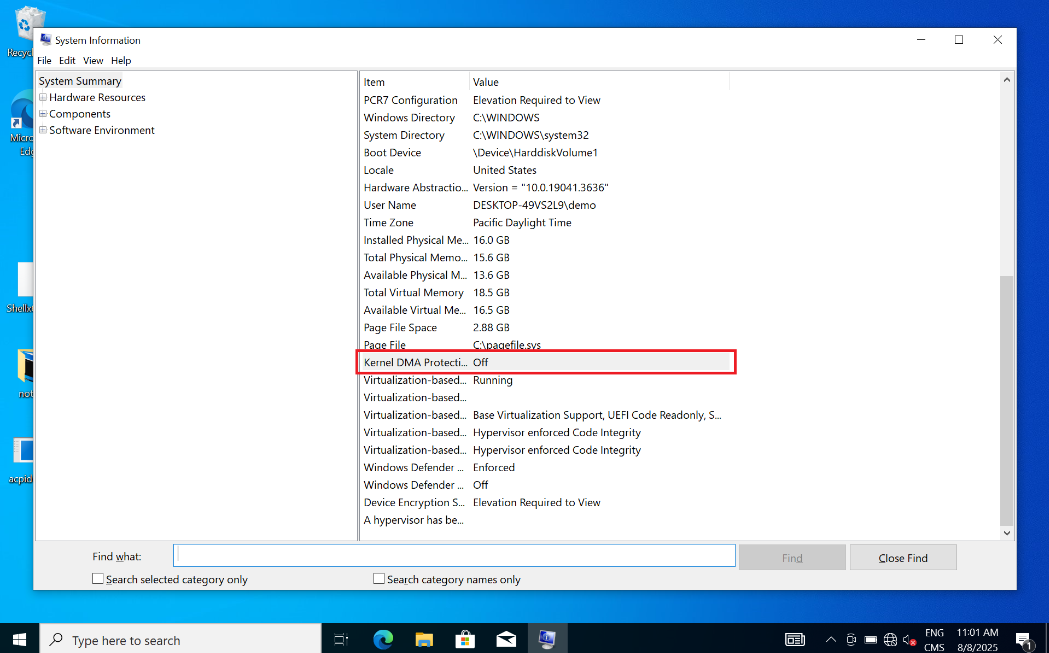
MSINFO32
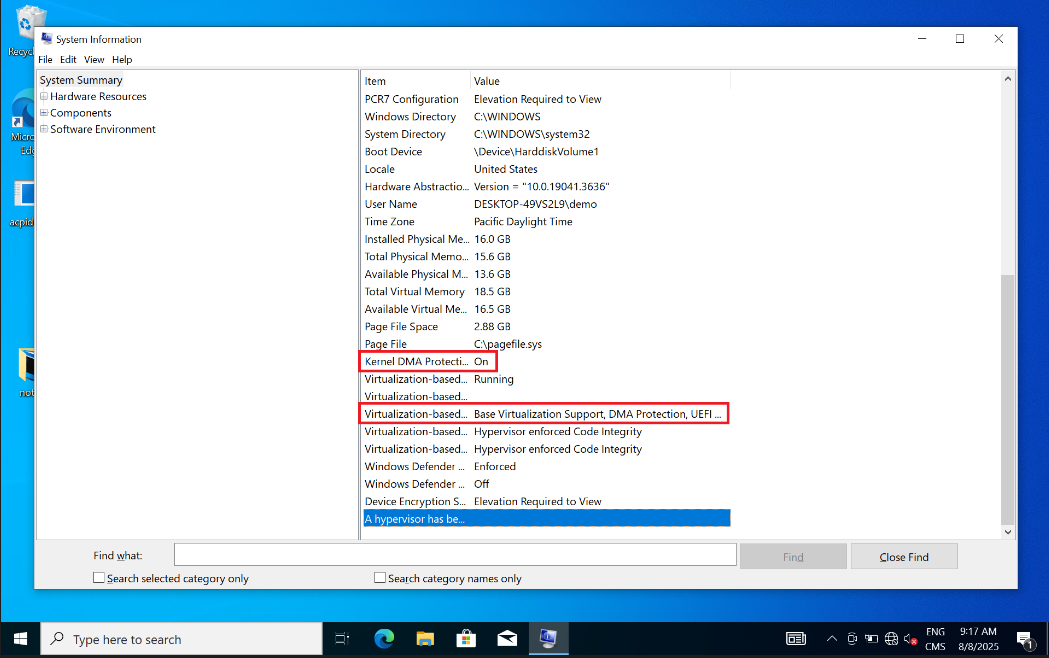
Alright so Kernel DMA Protection is enabled at the OS Level. Perfect ! Let’s get to work.
Theory
Kernel DMA Protection has several requirements in order to function properly. We can perhaps attack some of these requirements in order to disable it.
From Microsoft Documentation on Kernel DMA Protection :
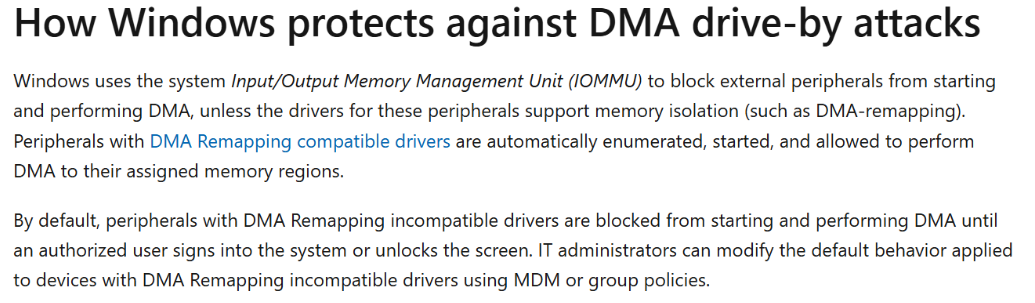
IOMMU is used. This makes sense, since we know IOMMU contains maps of physical to virtual memory each peripheral device is allowed to access.
So an obvious requirements seem to be VT-x and VT-d enabled in firmware.
This is evident from Microsoft documented instruction for enabling Kernel DMA Protection seen below :

Alright, we already have a method of attacking the OS when we can disable VT-x (FirstStrike), so let’s focus on VT-d. As stated in the caveats section, some UEFI implementatiosn limit our ability to turn off VT-x without first disabling VT-d, and turning off VT-d triggers BitLocker recovery. That won’t work. We need to leave the features on and still manage to disable DMA protection.
Let’s explore how VT-d works by reading the Intel Virtualization Technology for Directed I/O documentation :
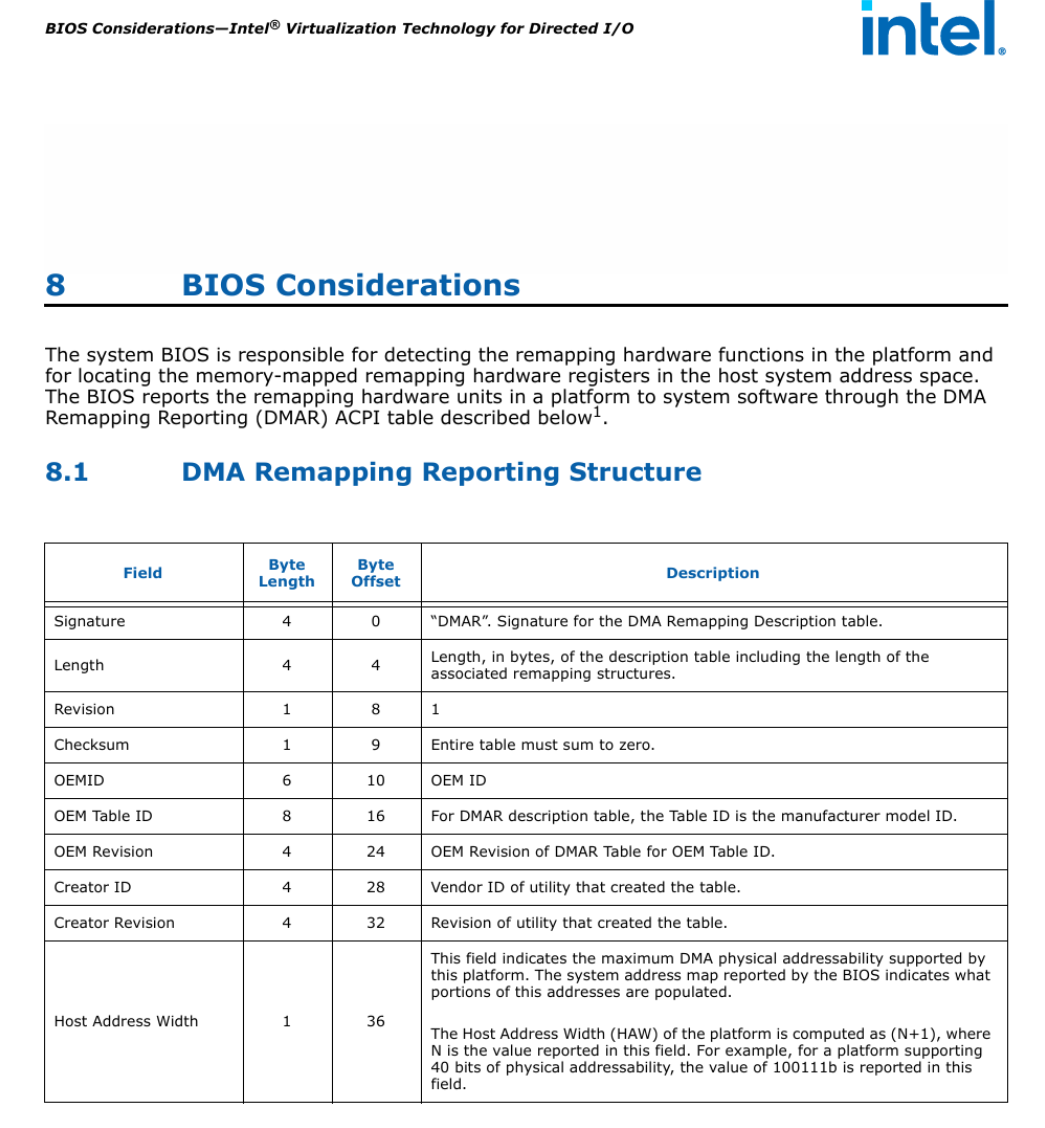
So, the IOMMU seemingly depends on VT-d reporting the remapping data to the OS through this DMA Remapping Reporting (DMAR) ACPI table structure.
What is ACPI ? Advanced Configuration and Power Interface. Essentially tables used by firmware to report capabilities and communicate functional data to the OS (think fans, backlights, hardware components, etc.)
These tables are just “Structures” in memory. Nothing too fancy here.
Ulf Frisk posted about this way back in 2016. He documents that nulling the DMAR ACPI can disable Virtualization Based Security.
While this is no longer the case in 2025, the technique may still impact Kernel DMA Protection, which is separate from VBS. We will set the DMAR ACPI table as our target for research! Ulf’s blog post assumes that attackers already know the address of the DMAR ACPI (by booting into Linux from a USB and using dmesg to grab logs from the kernel at boot). This is an unreasonable requirement for our pentest scenario, since most target computers will not allow us to control boot order or boot from USB. We will need to find the address ourselves. We can use a raw search, but this brings up several issues, not the least of which is reliability and time. I want something algorithmic!
On Windows, there is no easy way to read the address of DMAR ACPI from the OS. There are tools we can use to parse ACPI tables, but we cannot dereference the virtual address exposed to the operating system. And if we want to interact with this structure, we will need the physical address.
In UEFI, virtual and physical memory are mapped 1:1, so the best approach to identifying the location of the DMAR ACPI table is to do so from pre-boot environment. While we cannot do this during a pentest, we CAN do it for our R&D in order to create the attack primitive, and work backwards with that information to find a valid search technique. let’s get started.
Installing UEFIShell
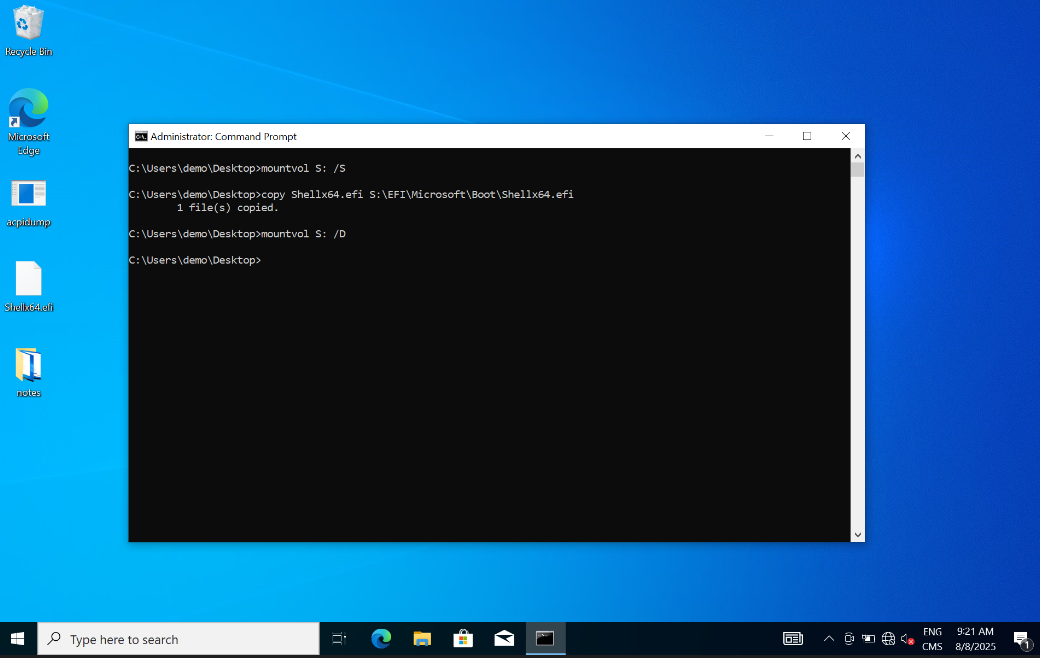
We can place a custom EFI program called UEFIShell into the boot partition of the windows system as shown below
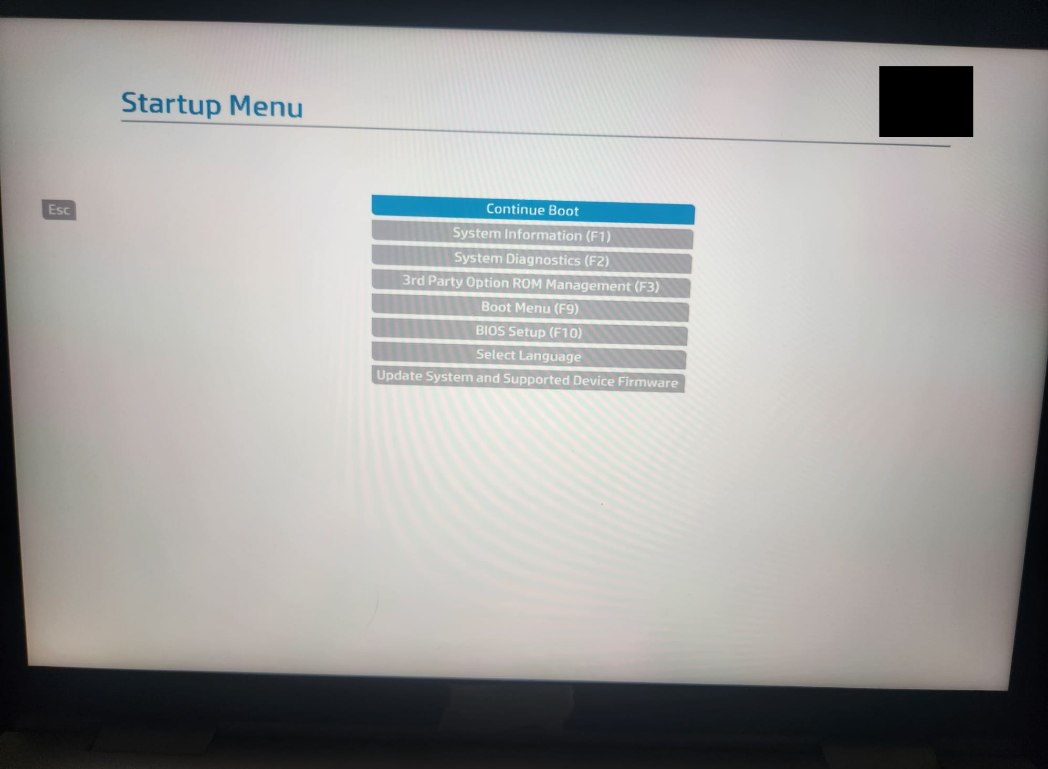
Once this EFI program is in place, we can reboot and boot into the shell from UEFI menu. First we open the Boot Menu (F9)
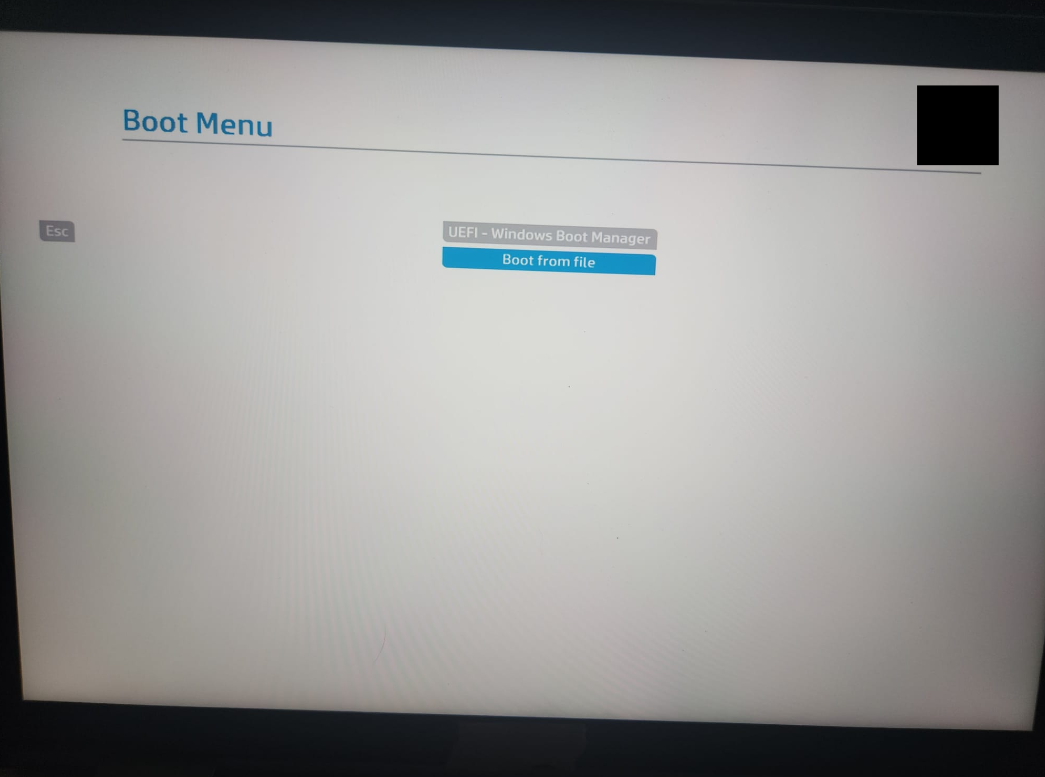
We select boot from file
Select the right volume
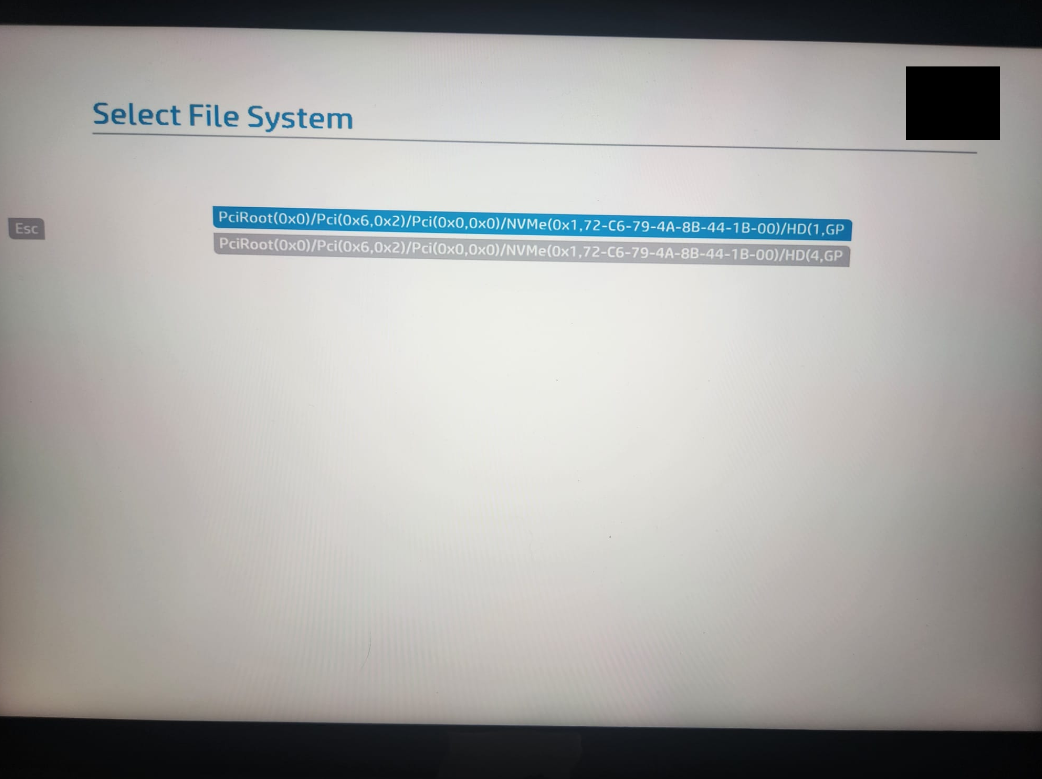
And now we can navigate to /EFI/Microsoft/Boot where we placed our Shellx64.efi program earlier
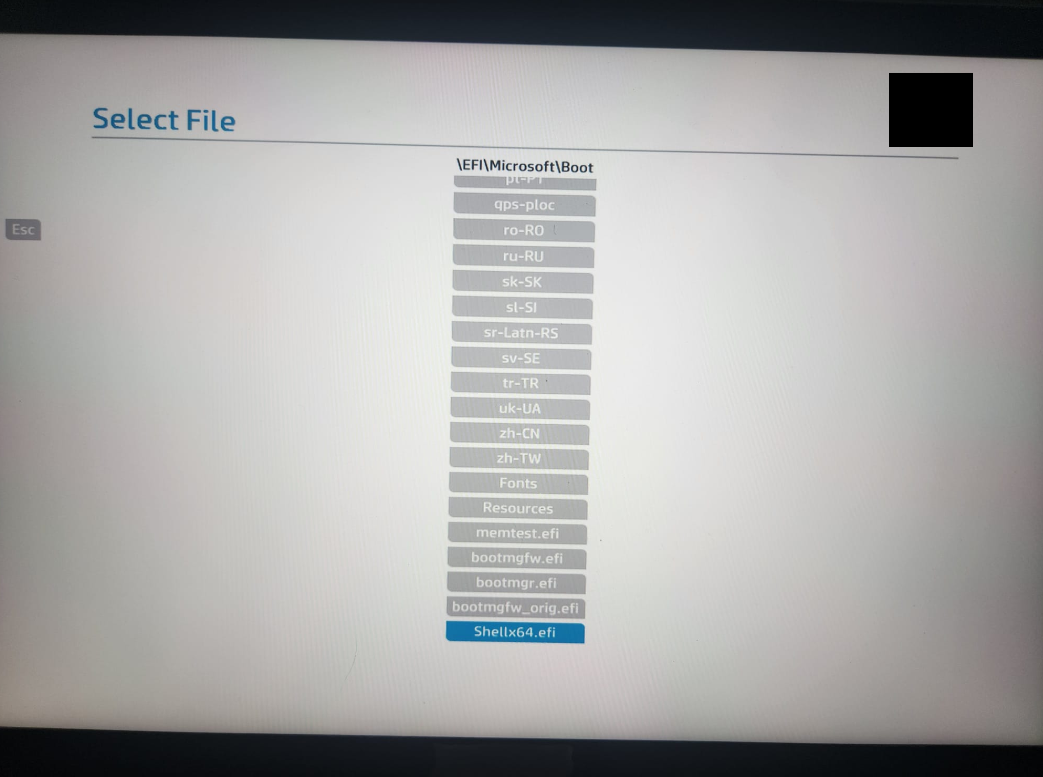
Running this, we get our UEFI Shell. This is great because it runs as a program within the current UEFI environment, meaning data structures in memory are representative of the normal pre-boot environment. We can use the built-in acpiview command to read the DMAR table and get its physical address for our R&D :
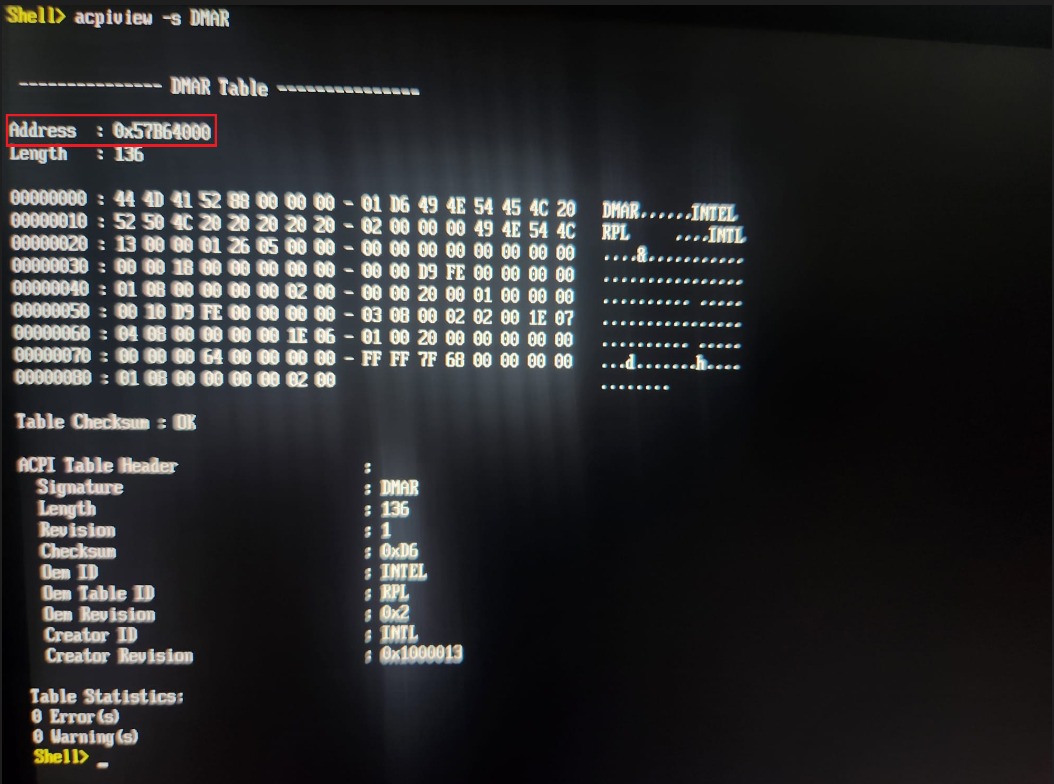
Sweet, now we know what we are looking for, the DMAR ACPI is located at 0x57B64000
Finding the DMAR ACPI programmatically
As stated, we can’t use acpiview from a DMA perspective, and booting UEFIShell only works in our lab environment because we intentionally disabled Secure Boot and have access to the Boot Menu in the first place. This won’t work during a pentest. We need a way to derive the physical address of the DMAR ACPI table programmatically using only our pre-boot DMA capabilities.
Leechcore
The PCILeech Framework includes a python API which acts as a wrapper around important basic functionality used to control the PCILeech firmware. This awesome tool is called LeechCore. We will leverage this to gain arbitrary READ/WRITE from our own python program so that we can implement custom logic without the overhead of modifying the C language components of the PCILeech client or modules.

We implement this library into a basic python program which will initialize the connection to our screamer board, and use the read(), read_scatter(), and write() functions to control the FPGA during pre-boot and obtain and modify important memory structures.
Starting from the EFI System Table
The EFI System table is a primary target for UEFI exploitation because it contains pointers to all the important functions and structures that an EFI program may require to run during pre-boot. This includes pointers to functions like BootServices and RuntimeServices, but also pointers to data structure as we will see.
Crucially, we can locate the EFI System Table by reading memory during pre-boot and flagging the IBI SYST hex pattern 4942492953545359. We will implement some basic logic in python to scan memory for this, and to eliminate false positives by checking for stuff like revision number and size to ensure validity.
The search for the table and resultant structure is seen here :
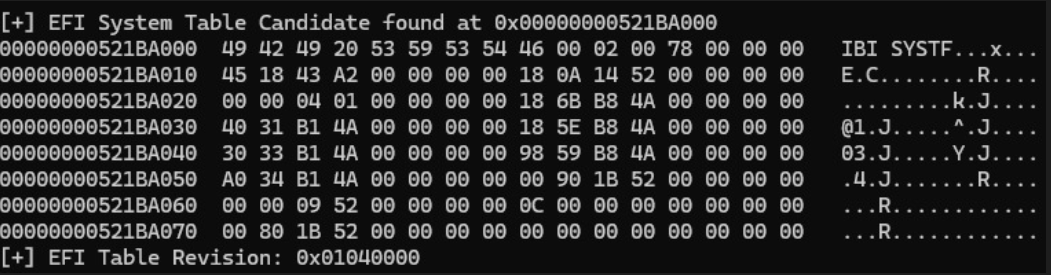
Now that we can reliably find the EFI System Table, we can get to its content!
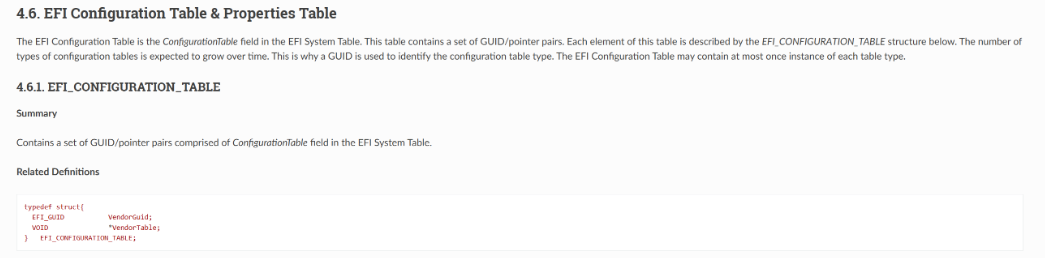
Configuration Table
The UEFI 2.1 Standard describes the Configuration Table below :
The Table will contain GUID/Pointer pairs that we are interested in. Crucially, the offsets of this structure from the EFI System Table Base address is always the same
So, we know that at 0x68 from the EFI Table base address, we will have the “Table Entries” value describing how many GUID/Pointer pairs exist, and
at 0x70 from the EFI Table base address, we will have a pointer to the Configuration Table data.
We see that in our dump of the System table below, at exactly offset 0x70 as expected
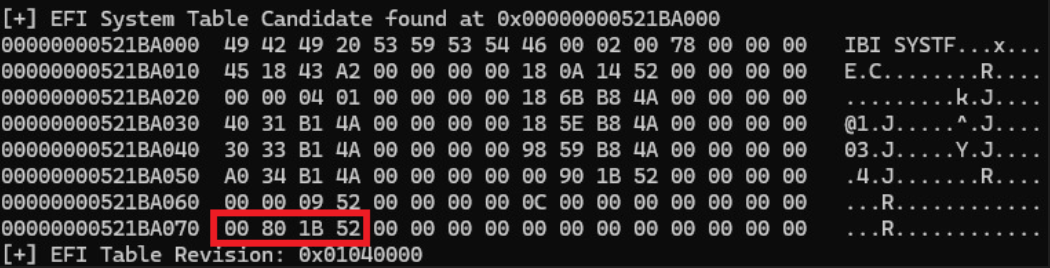
The Configuration Table Pointer in little Endian is 0x521B8000
We can walk this table in python easily. The raw memory looks like this :
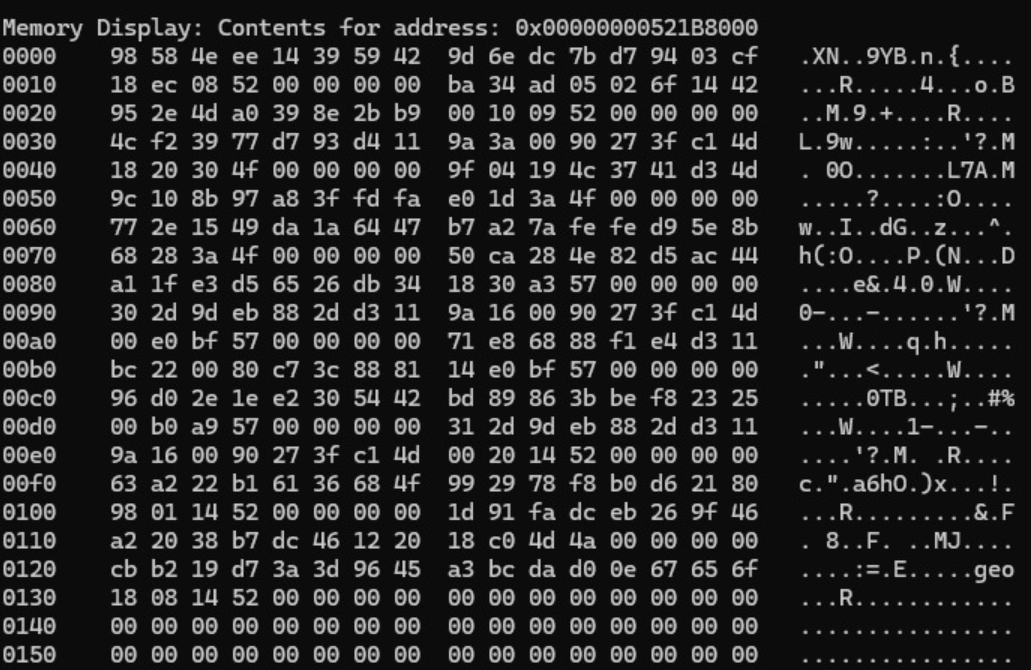
Again, according to the UEFI 2.1 Specs, this section contains GUID/Pointer pairs. The GUIDs are 16 bytes long and the Pointers are 8 bytes long making each entry 24 bytes total. We can walk these programmatically in 24 byte chunks to parse them.
Once we find the right GUID, we will use its accompanying pointer to get to that entry’s VendorTable data structure.
From the documentation, “Industry Standard GUIDs” are described

We want to find ACPI tables, so we are interested in the EFI_ACPI_20_TABLE_GUID value!
The doc shows the value as {0x8868e871,0xe4f1,0x11d3, \ {0xbc,0x22,0x00,0x80,0xc7,0x3c,0x88,0x81}}
Confusingly, the structure uses a mix of Little and Big Endian for its different parts. If we want to pattern match, we need to normalize the different endianness of this string.
The three parts before the slash are little endian and everything after the slash is big endian, leading to:
EFI_ACPI_20_TABLE_GUID = 71 E8 68 88 F1 E4 D3 11 BC 22 00 80 C7 3C 88 81
We locate the accompanying pointer in the Configuration table dump as shown below :
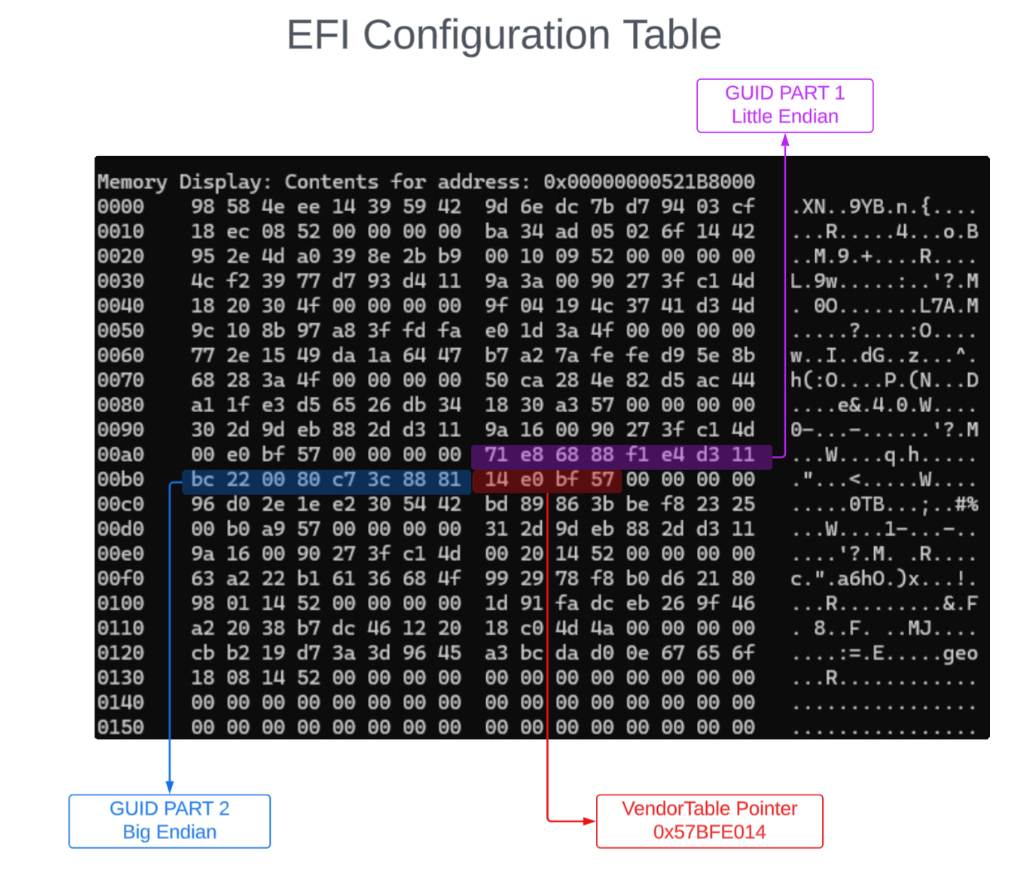
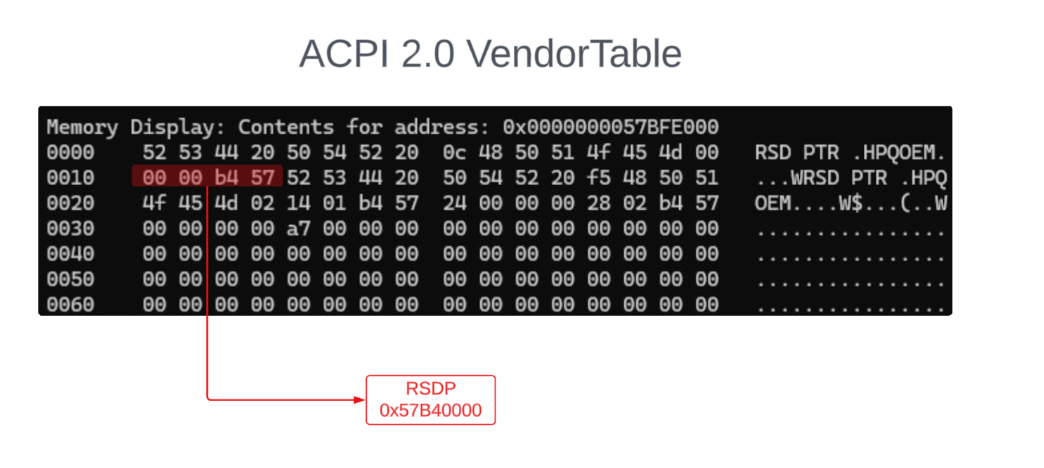
ACPI 2.0 VendorTable
Now that we have the pointer to the ACPI VendorTable (0x57BFE014) we can read from that address. The objective is to find the Root System Description Pointer (RSDP) value, which points to the location of the Root System Description Table (RDST). Read more about this from the UEFI docs here.
We find the pointer precisely at the previously obtained address, reading 4 bytes backwards.
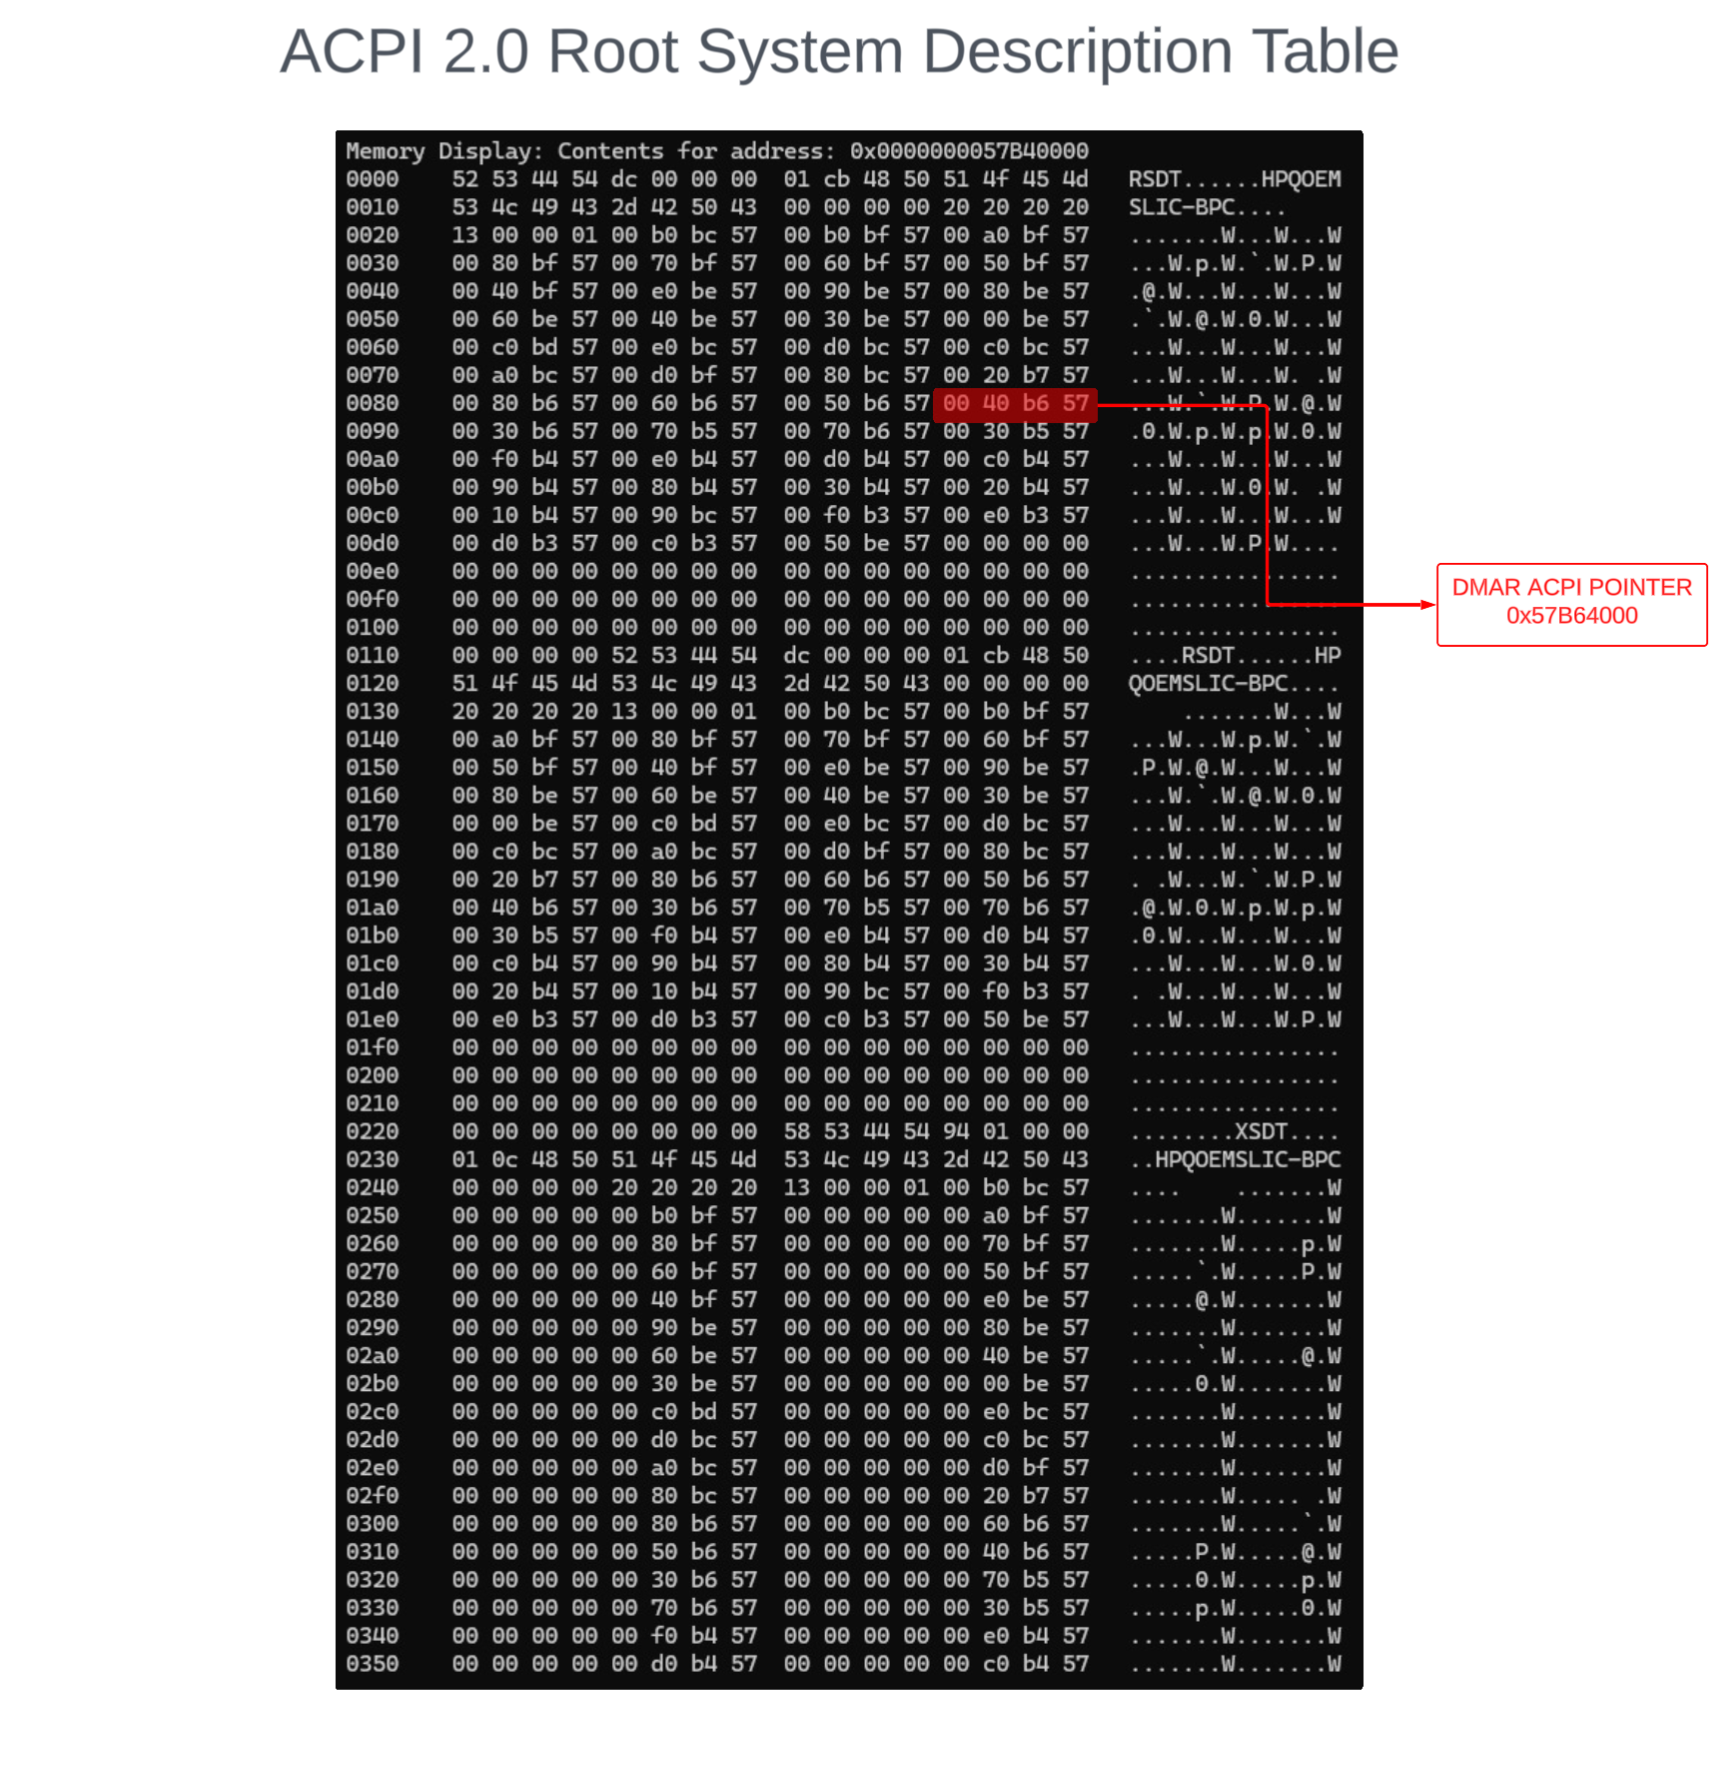
Root System Description Table
With the RSDP known, we can find the RSDT. This table contains pointers to all the ACPI tables currently installed in the firmware! We will parse them one by one and read the data at the locations they point to, searching for an entry starting with the DMAR signature in hex. 444D4152
Among the entries is the same address we obtained earlier using the acpiview program (the address is relatively static across reboots).
We can confirm by parsing the memory at 0x57B64000 manually. We see the content of the DMAR ACPI table :
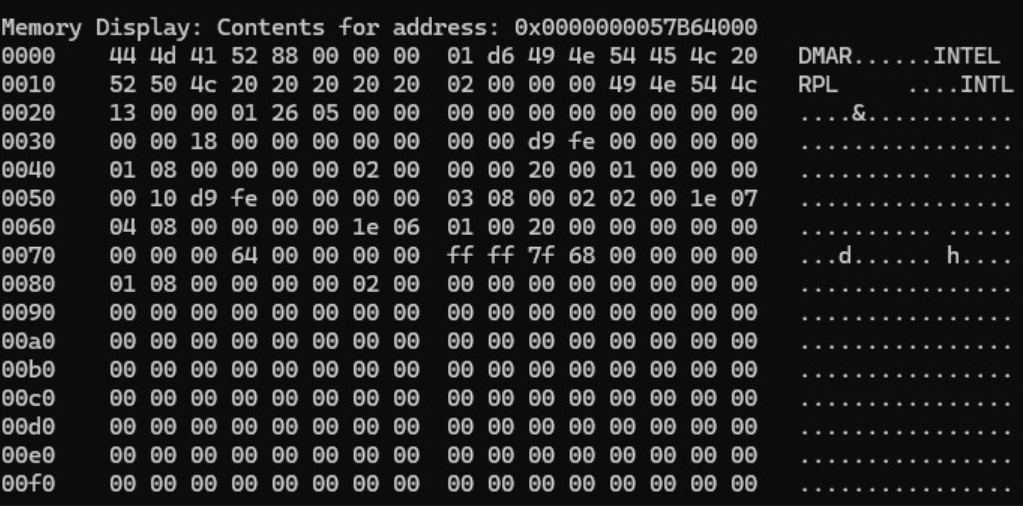
This is the physical address of our target !
DMAReaper.py
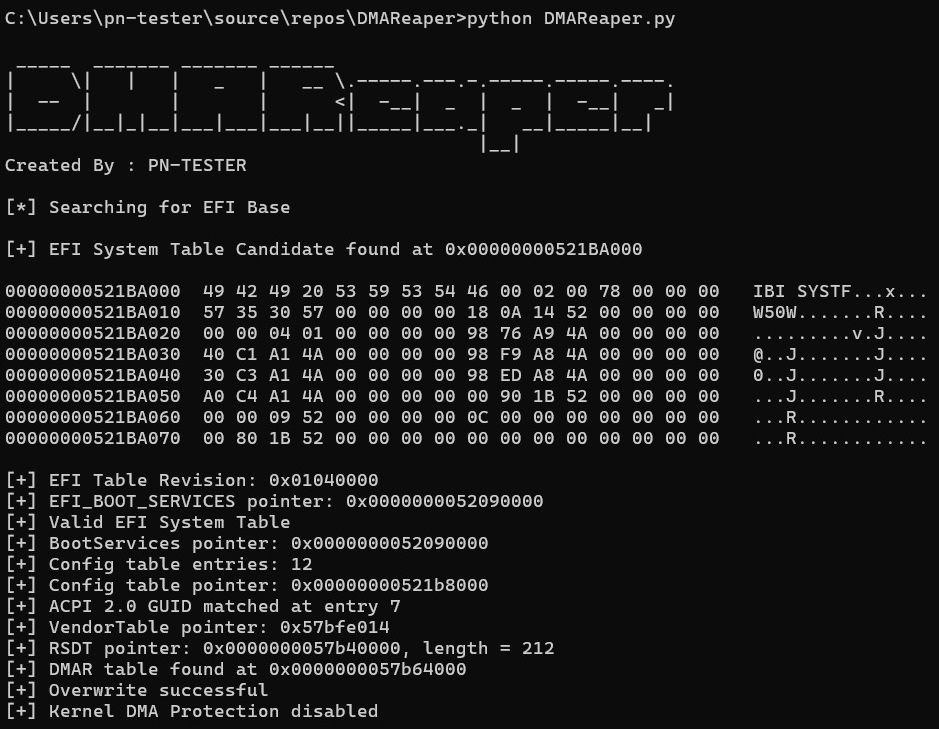
Now that we have the algorithm for finding the DMAR ACPI address, we can implement it in python leveraging the LeechCore library to control the FPGA.
DMAReaper will perform pre-boot DMA attack to identify the location of the DMAR ACPI table and overwrite it with 64 zeroes.
Execution against Windows 11 24H2 is shown below. The program takes the following logical steps:
- Scan memory using scatter search in 100 x 4096 byte chunks (size of a page)
- Find the EFI System Table Base address
- Find the Configuration Table using the EFI System Table Base address
- Parse each entry to find the ACPI 2.0 GUID
- Find the paired ACPI 2.0 VendorTable pointer
- Find the Root System Description Pointer in the ACPI 2.0 VendorTable
- Find the Root System Description Table for ACPI 2.0
- Read memory at each ACPI table pointer in RSDT
- Identify the DMAR ACPI Table
- Overwrite the DMAR ACPI Table with 64 zeroes
What happens if we boot now?
Kernel DMA Protection Disabled
Windows 10 and Windows 11 will boot without complaining, but the DMAR ACPI table cannot be located since it was destroyed. This means that no IOMMU can be used, which means Kernel DMA Protection cannot be initialized!
We can verify this again by checking “Device Security”
Windows 10 - Device Security
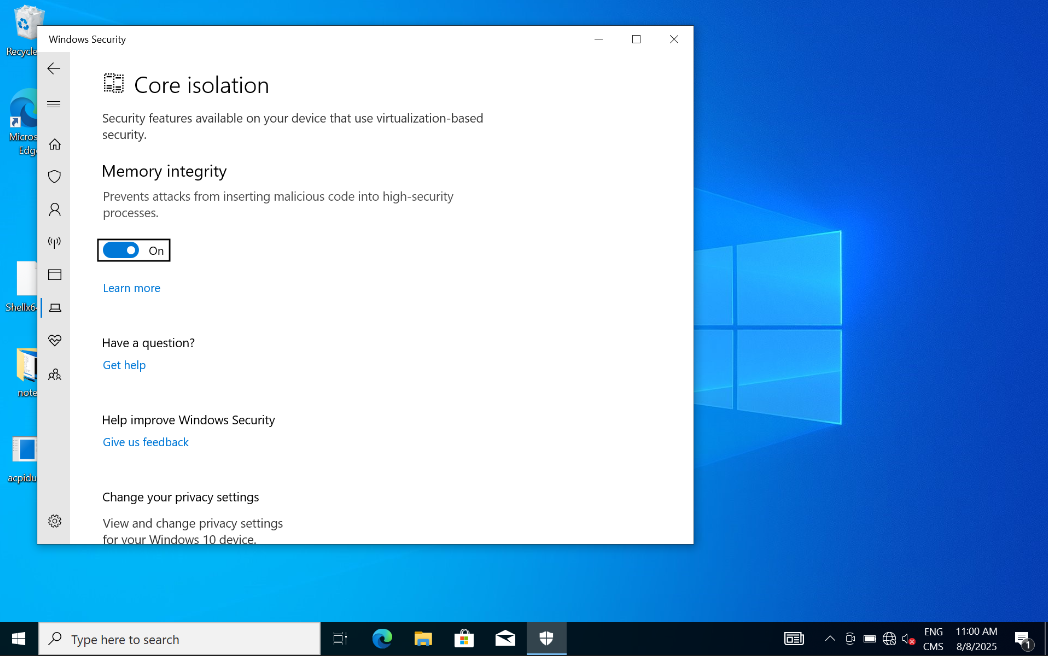
Windows 11 - Device Security

Memory Access Protection is now missing from the Core Isolation features!!
let’s check MSINFO32 as before :
Windows 10 - MSINFO32
Windows 11 - MSINFO32
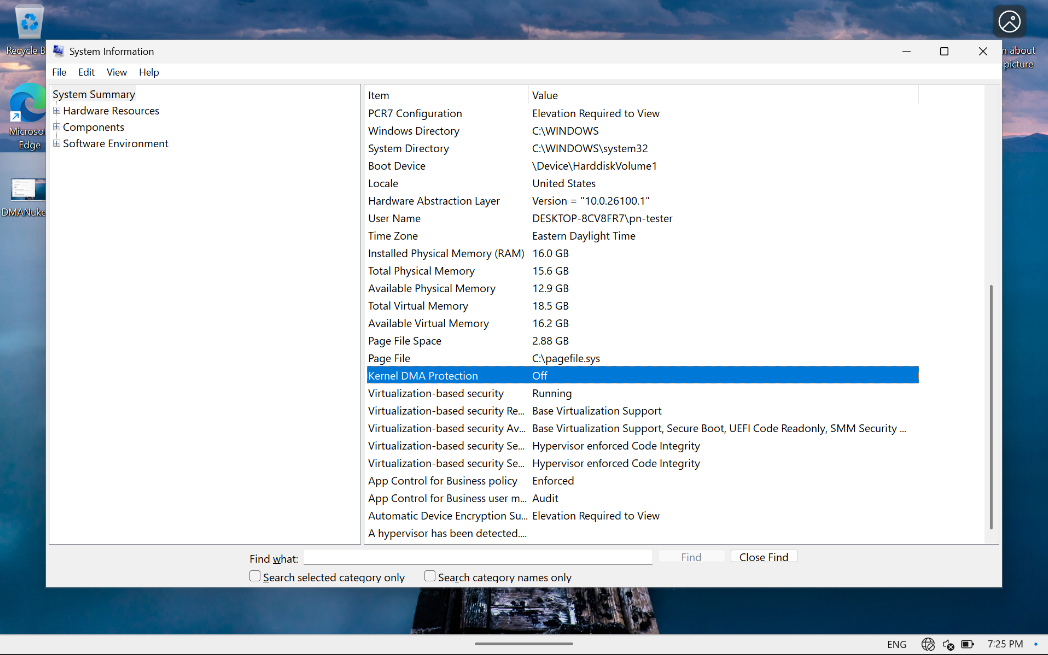
System information is reporting that Kernel DMA Protection is OFF
Virtualization-based security capabilities no longer reports DMA Protection as available.
Yet in the UEFI firmware configuration :
- DMA Protection is still enabled
- VT-x is still enabled
- VT-d is still enabled
- Secure Boot is enabled
- BIOS Sure Start is enabled
- Virtualization based BIOS protection is enabled
- Enhanced Firmware Runtime Intrusion Detection and Prevention is enabled
We have successfully demonstrated that pre-boot DMA attacks can bypass OS level DMA Countermeasures that depend on communication with firmware components. This is working as of August 2025 against modern windows targets.
Special thanks to Ulf Frisk their enormous contributions to the DMA Research community!